
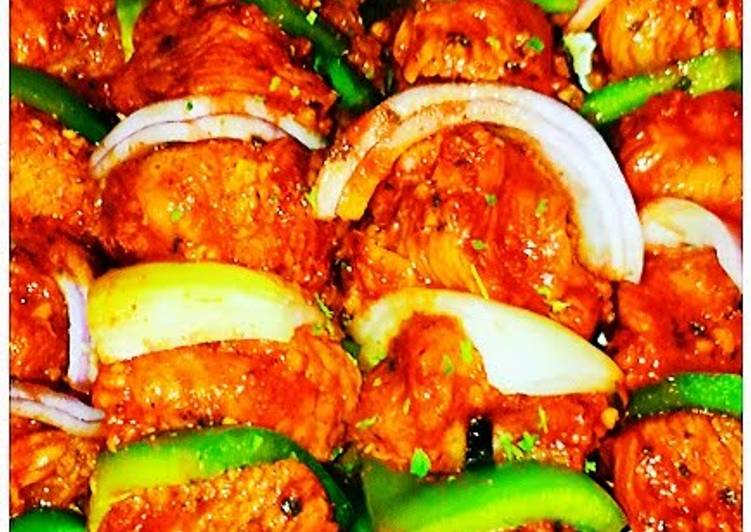
Mike's Garlic Sriracha Chicken Scewers.
 You can cook Mike's Garlic Sriracha Chicken Scewers using 29 ingredients and 22 steps. Here is how you cook that.
Ingredients of Mike's Garlic Sriracha Chicken Scewers
- It's of Meat.
- Prepare 4 1/2 lb of Boneless Chicken Breasts [fat trimmed - cut into 1"x1" cubes].
- It's of Brine.
- You need 4 cup of Water.
- Prepare 4 cup of Ice.
- You need 1/2 cup of Ionized Table Salt.
- Prepare 1/3 cup of Granulated Sugar.
- It's 2 tbsp of Garlic Powder.
- It's 2 tbsp of Onion Powder.
- It's 1 gallon of Ziplock Bag Or Large Bowl [to hold chicken for brining].
- You need of Garlic Sriracha Sauce.
- Prepare 1 cup of Sriracha Chili Sauce.
- You need 1/3 cup of Pureed Squeezable Garlic.
- Prepare 1 tbsp of Each: Red Pepper Flakes - Onion Powder - Dried Onions Flakes - Dried Cilantro - Dried Parsley - Worshestershire Sauce - Paprika - Italian Seasoning.
- You need 1 tsp of Each: Black Pepper & Ground Cumin.
- Prepare 4 of Drops Liquid Smoke.
- You need 2 tbsp of Olive Oil [added last].
- It's 1 gallon of Ziplock Bag [for garlic sriracha marinade].
- It's of Vegetables & Garnishments.
- Prepare 2 large of Extra Large Vidalia Onions [1"x1" chop].
- It's 2 of Red & Green Bell Peppers [optional] [1"x1" chop].
- Prepare 1 of Purple Onion [optional] [1"x1" chop].
- Prepare 1 1/2 cup of Fresh Chopped Chives [for garnish].
- You need 1 of Bottle Sriracha [for serving].
- Prepare 1 tub of Sour Cream [for serving].
- You need of Bread.
- You need 1 packages of 6" Round - Flour Tortillas.
- Prepare 1 pinch of Each Per Tortilla: Ground Cumin - Garlic Powder - Onion Powder & Black Pepper.
- It's 1 can of Olive Oil Spray Pam.
Mike's Garlic Sriracha Chicken Scewers step by step
- De-thaw and rinse chicken keeping it separate from other foods or vegetables. Cut chicken breasts into 1"X1" cubes..
- Authors Note: If you've never brined chicken before, now is the time to start! Brining your chicken results in moist, plump and more flavorful chicken every time. The only fall back to brining is it makes it harder to achieve a char on your chicken if grilling. If that's a concern, after brining, dab chicken dry and allow to set uncovered in the fridge for about an hour, then grill..
- FOR THE BRINE: Mix all brine ingredients [except for the ice] and 2 cups water, and put on stove top to warm. This won't take long and shouldn't require much heat for them to dissolve..
- Allow your brine water to cool just a bit and add all ice and more cold water to it. Your brine water needs to be between 36° and 40° to be the most effective..
- Place your chicken breast cubes in your large Ziplock Bag or large bowl along with your seasoned brine water and ice. Make sure the chicken is fully submerged in brine water. Seal bag or cover bowl and place in fridge for 2 1/2 to 4 hours..
- Author's Note: If you're waiting to chop your chicken breasts into 1"x1" cubes until AFTER your brine, brine whole chicken breasts for 6 to 8 hours..
- Chop your onions [or additional veggies] in 1"x1" squares. These veggie squares will seat snugly in between each chicken cube on your scewers. They will promote even cooking as well as flavoring & moisture. Use 2 pieces of onion each in between your chicken cubes..
- After brining, drain chicken breast cubes and dab dry..
- Make Garlic Sriracha Sauce and mix in a large Ziplock bag..
- Place cubed chicken in Sriracha Sauce ZipIock Bag with seasonings and massage well. Add 2 tablespoons Olive Oil in the same bag and massage well again. Adding the oil before your marinade will seal your chicken and not allow the marinade to fully absorb so add it last..
- Place Sriracha bag in the fridge and chill for 2 hours if at all possible massaging and turning regularly..
- Feed chicken onto scewers one piece at a time followed by one veggie piece, and so on until scewer is fully loaded. Repeat process with the rest of your scewers..
- Once constructed, spray all scewers with a non-stick, high heat BBQ grilling spray [or Pam] At this point I usually sprinkle scewers with additional garlic and onion powder and a bit of Italian Seasoning..
- Place scewers on your cleaned hot grill at 450°+..
- Check on chicken scewers regularly and rotate intermittently making certain not to burn. Watch your onions closely as they are great warning indicators for potential burning. You'll want your chicken scewers slightly charred, not burnt. If you do want your chicken more spicy, brush your skewers with Sriracha just before pulling them off the grill..
- Have a clean plate ready for your grilled scewers once cooked. Do not place cooked scewers on the same plate you originally had your raw chicken seated upon. Pull chicken from grill once fully cooked. About 14 - 18 minutes at 450°..
- Once grilling is completed, spray each of your tortillas lightly with spray Pam on one side and sprinkle each of the spices listed in the bread section lightly on top of them. Lightly spray Pam once more to seal the spices on the tortillas..
- Place tortillas on the grill and watch them very closely. Once they begin to char or brown and bubble up, pull them off the grill..
- Serve chicken and onion skewers on warm tortillas with a dab of sour cream and a sprinkle of chives. Also, offer a bottle of Sriracha separately for those who want additional heat..
- If you don't have a grill or skewers, you can place all ingredients on a tinfoil lined cookie sheet and bake at 400° for 35 minutes or until fully baked. Turn intermittently..
- Using tongs, you can also make tortillas as directed and place on an open flame on your gas stove top until browned and edges are slightly crispy instead of grilling..
- Enjoy!.